skip to main |
skip to sidebar
Materials:
A - Crimp bead silver plated x 2 pcs
B - Clam Shell x 2 pcs
C - Lobster Clasp x 1 pc
D - Extender Chain x 1 pc
E - 0.25 mm Non-Elastic Bead Thread x 1pcs (Length: 80cm)
Please use transparent bead thread for your bead work. The picture illustrate is using black color bead thread for better understanding. *o*
Tooling:
Super fine flat nose pliers
Round nose pliers
Let's start:
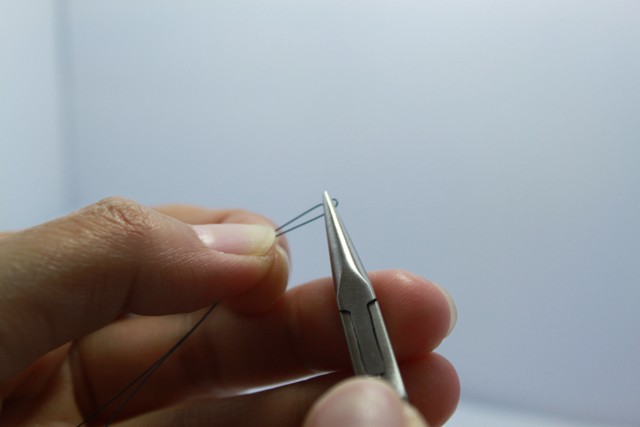
Step1: String left hole of a crimp bead with using left hand string, while string right hole of the same crimp bead with using right hand string as shown.
Step2: Hold both end strings and pull the crimp bead to the end of the string. Flatten the crimp bead with flat nose pliers.
Step3: String both strings to the hole of the clamshell. Pull the string till the crimp bead reaches the centre of the clamshell. Close clamshell with flat nose pliers.
Step4: Now, you can start your bead works. The next step will illustrate how to end your beadworks.
Step5: String both strings to the hole of the clamshell from bottom side. Take note of the direction of the clamshell.
Step6: Cross a crimp bead with both end strings. Pull the string tightly. Make sure don’t over tight your beadwork ooo. Make a simple knot on the string. Flatten the crimp bead with flat nose pliers.
Step7: Put some glue on the crimp bead. Close clamshell with flat nose pliers. Cut the excess string.
Step8: Attached left side clamshell with lobster clasp. Make a loop of the clamshell with round nose pliers.
Step9: Attached right side clamshell with extender chain. Same step, make a nice loop on the clamshell with round nose pliers.
If you wish to learn how to make a simple knot. Please refer to Basic Technique: How to make a Simple Knot with bead thread for the correct way of doing the knot.


No comments:
Post a Comment