Wednesday, January 25, 2012

Crystal Bracelet 1

Materials:
A - 6mm Swarovski Bicone #5328 206 Sapphire AB x 36 pcs
B - 3mm Swarovski Bicone #5328 001 AB x 72 pcs
C - SS16 Crystal x 8 pcs
D - Crimp bead silver plated x 2 pcs
E - Lobster Clasp x 1 pc
F - Clam Shell x 2 pcs
G - Extender Chain x 1 pc
H - 0.3 mm Non-Elastic Bead Thread x 1 pc (Length: 100 cm)

Tooling:
Flat nose pliers
Round nose pliers

Let’s start:
Step1: Get ready the close clam shell with bead thread as shown in picture below. Please refer to Basic Technique: How to use Clamshell and Crimp Bead.

Step2: String the Swarovski Beads using bead thread by follow the beading diagram below.

Step3: End the design by another clam shell. Attach lobster clasp and extender chain on the bracelet.

The below illustrate others color combination with this design. Hope you like it. 


Wednesday, January 18, 2012

Pineapple Decoration

CNY coming soon.. I make this pineapple for myself.. Huat ar!!!

Materials:
A - 5mm Swarovski Bicone #5328 Light Topaz AB #226 x 68 pcs 
B - 5mm Swarovski Bicone #5328 Topaz AB #203 x 32 pcs 
C - 5mm Swarovski Bicone #5328 Olivine AB #228 x 28 pcs 
D - 0.40 mm Non-Elastic Bead Thread x 1 pc (Length: 120cm)

Let’s start:
Step1: String the swarovski bead by follow the beading diagram as following:


Step2: Tie a knot when finish the product. A beautiful and nice pineapple decoration done. 


Tuesday, June 14, 2011

Flower Ring 2

Materials:
A - 4mm Swarovski Pearl #5810 001 650 Crystal White Pearl x 1 pc 
B - Plastic Flower, White Opal x 1pc 
C - Clay Flower, Blue x 2 pcs 
D - Ring metal x 1 pc

Tooling:
Glue
Let’s start:
Step1: Glue the material A, B, C and D on the metal ring. You can finish the ring within 5 mins.  

Monday, June 13, 2011

Flower Ring 1

Materials:
A - 4mm Swarovski Pearl #5810 001 650 Crystal White Pearl x 6 pcs 
B - 6mm Swarovski Pearl #5810 001 650 Crystal White Pearl x 1 pc 
C - 4mm Swarovski Bicone #5328 289 Indian Pink AB x 1 pc 
D - Clay Flower, Pink x 2 pcs 
E - Ring metal x 1 pc 
F - 0.25 mm Non-Elastic Bead Thread x 1 pc (Length: 5cm) 

Tooling:
Glue
Cutter

Let’s start:
Step1: String 5 pcs of 4mm Swarovski Pearl with a bead thread. Make a simple knot.


Step2: Glue the material A, B, C and D on the metal ring. A beautiful and simple ring is done.


Thursday, May 26, 2011

Flower Bracelet 2

Materials:
A - 4mm Swarovski Bicone #5328 ChalkWhite AB 2X x 69 pcs 
B - 11/0 TOHO Seed Beads x 16 pcs 
C - Link, Silver Plated Brass, 8x2 mm, curved shape x 18 pcs 
D - Crimp bead silver plated x 2 pcs 
E - Lobster Clasp x 1 pc 
F - Clam Shell x 2 pcs 
G - Extender Chain x 1 pc 
H - 0.25 mm Non-Elastic Bead Thread x 1 pc (Length: 80cm) 

Tooling:
Flat nose pliers
Round nose pliers

Let’s start:
Step1: Get ready the close clam shell with bead thread as shown in picture below. Please refer to Basic Technique: How to use Clamshell and Crimp Bead.

Step2: String the Swarovski Beads using bead thread by follow the beading diagram below.


 The below illustrate others color combination with this design.

Friday, May 20, 2011

Butterfly Bracelet 2

Materials:
A - 4mm Swarovski Bicone #5328 249 Citrine AB x 60 pcs 
B - 4mm Swarovski Bicone #5328 280 Jet Hem 2X x 29 pcs 
C - 11/0 TOHO Seed Beads x 16 pcs 
D - Link, Silver Plated Brass, 8x2 mm, curved shape x 18 pcs 
E - Crimp bead silver plated x 2 pcs 
F - Lobster Clasp x 1 pc 
G - Clam Shell x 2 pcs 
H - Extender Chain x 1 pc 
I - 0.25 mm Non-Elastic Bead Thread x 1 pc (Length: 80cm) 

Tooling:
Flat nose pliers
Round nose pliers

Let’s start:
Step1: Get ready the close clam shell with bead thread as shown in picture below. Please refer to Basic Technique: How to use Clamshell and Crimp Bead if you are the beginner.

Step2: String the Swarovski Beads using bead thread by follow the beading diagram below.

Step3: Repeat the step 6, 7, and 8 [refer beading diagram] for another 7 sets. You may extend the beading design based on your wrist. End the beading design with repeat step 1 [refer beading diagram] and close clamshell properly.

The below illustrate others color combination with this design. Hope you like it.


Wednesday, May 18, 2011

Butterfly Bracelet

Materials:
A - 4mm Swarovski Bicone #5328 280 Jet Hem 2X x 44 pcs 
B - 4mm Swarovski Bicone #5328 Crystal AB x 40 pcs 
C - Link, Silver Plated Brass, 8x2mm, Curved Shape x 20 pcs 
D - Crimp bead silver plated x 2 pcs 
E - Lobster Clasp x 1 pc 
F - Clam Shell x 2 pcs 
G - Extender Chain x 1 pc 
H - 0.25 mm Non-Elastic Bead Thread x 1 pc (Length: 80cm) 

Tooling:
Flat nose pliers
Round nose pliers

Let's start:
String the Swarovski Beads using bead thread by follow the beading diagram below.

Stop beading once your desire length of bracelet is achieved. There are severals of color combination can be done with this designed. Hope you like it

280 Jet Hem 2X VS Crystal AB


White Copal 234 AB VS Citrin 249 AB 


White Copal 234 AB VS Amethyst 204 AB

How to start and end the findings? Please refer to Basic Technique: How to use Clamshell and Crimp Bead.

While Silver Metal Beads Necklace

Materials:
A - 15mm White Silver Metal Beads X 3pcs
B - 10mm White Silver Metal Beads X 4pcs
C - 3mm White Silver Metal Beads X 14pcs
D - Eye Pin, length:3.0cm,white silver X 7 pcs
E - Metal Chain, length 13 cm X 2 pcs
F - Lobster Clasp with O Ring X 1pc
G - C Ring, 4mm, white silver


Tooling:
Round nose pliers
Super fine flat nose pliers
Cutter


Let's Start:
Step1: Add items 1XC, 1XB, 1XC through eye pin as illustrate. Make a simple loop using round nose pliers. Repeat the step for another 3 sets.

Step2: Add items 1XC, 1XA, 1XC through eye pin and make a simple loop using round nose pliers. Repeat the step for another 2 sets.

Step3: Attached finished item in Step1 and chain using flat nose pliers.

Step4: Attached finished item in Step1 and Step2 in below sequences using flat nose pliers.

Step5: Cut the excess chain using cutter, length of the metal chain is 13 cm each side. You may cut the metal chain based on your preference. You may use shorter chain so that this necklace will become choker. Attached the other end of chain with lobster clasp and O Ring with C ring by using flat nose pliers. An elegant and sweet necklace done.

Silver Charm Bracelet

Materials:
A - Silver Bracelet with clasp (Diameter - 3mm) X 1pc
B - White Silver Metal Beads (size: 6mm) with holes diameter 4mm X 18 pcs
C - Designed charms findings X 4 pcs


Let's start:
String the metal beads and designed charms findings using the silver bracelet with your desired sequence. Close the clasp of the bracelet.


Tuesday, May 17, 2011

Simple Swarovski Rondell Cylinder Earrings

Materials:
A - 5mm Round Rondell with one hole x 4 pcs
B - 5mm Swarovski Round #5000 Black Hem 2X x 2 pcs
C - Crimp bead silver plated x 4 pcs
D - T Flat head pin-3.0cm x 2 pcs
E - French hook with ball x 2 pcs
Tooling:
Flat nose pliers
Round nose pliers
Cutter


Let's start:
Step1: Slide crimp bead onto the T flat head pin. Flatten the crimp bead with flat nose pliers as shown.
Step2: Add items 1xA, 1xB, 1xA, 1xC through T flat head pin as illustrate.
Step3: Bend the excess T flat head pin to 90 degree with Round Nose Pliers.
Step4: Use Round Nose Pliers to make a round loop as illustrate.
Step5: Use Cutter to cut the excess head pin.
Step6: Use Round Nose Pliers/Flat Nose Plier to open the loop of ear hook in upward position.
Step7: Attached the open ear hook and beaded Rondell Cylinder. Close the opened loop in opposite direction. Done the first earring.
Step8: Repeat the above steps with another earring.


If you like bigger earring style, you may change the item A and item B to bigger size. You may also change item B to Pearl. This earring can match to Simple Swarovski Rondell Cylinder Necklace. Hee..


For proper beading instruction, normally is cut the excess head pin before the loop is made. To me, I find more practically is made the loop first before cut off the excess head pin to avoid overcut the excess pin. You may choose your own preference for this skill.

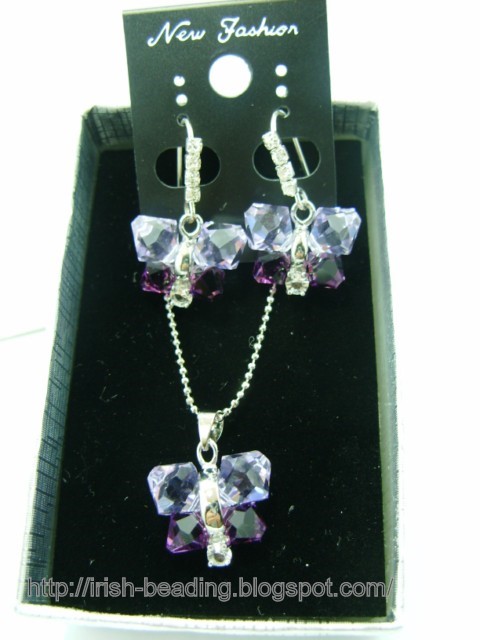
Simple Butterfly Pendant and Earrings

Materials:
A - 6mm Swarovski Top-Drilled Bicone #6301 204 Amethyst AB x 6 pcs
B - 8mm Swarovski Top-Drilled Bicone #6301 371 Violet AB x 6 pcs
C – Butterfly Pendant Bail x 3 pcs
D - French hook with ball x 2 pcs
OR Diamond earring hook illustrate on purple color's earrings
E - Chain x 1 pc
F - 0.25 mm Non-Elastic Bead Thread x 3 pcs (Length: 15cm per pc)


Tooling:
Round nose pliers


Let's start:
Step1: String the item A, B and item C using bead thread by follow the beading diagram below. Take note of the direction of the butterfly pendant bail.
Step2: Pull the string tightly. Make a simple knot on the string. Cut the excess string. A butterfly pendant done @@@ Surprise with so fast and easy???


Step3: Repeat Step 1 and Step 2 for another two butterfly pendants. Cut the bail and attached it to the open ear hook (item D). Close the gap in opposite direction using round nose pliers. Thus, a pair of butterfly earring completed.
A simple and cheap jewelry set is done. Very easy and fast, right?